Bluey Socks…….Pair # 29

I was up until 11.30pm last night which is simply unheard of for me. I started knitting the Ilene Bag and was so excited about how it was turning out that I couldn’t put it down! I hope to finish it in the next day or so, so I’ll show you the pics then but here’s a glimpse.

Ilene Bag 01

Lovely bright red Patons Bluebell 5ply (sport) yarn that I bought over a year ago in a job lot on Ebay. It is the perfect yarn for this bag as it stretches so well.

Okay now back to this post….

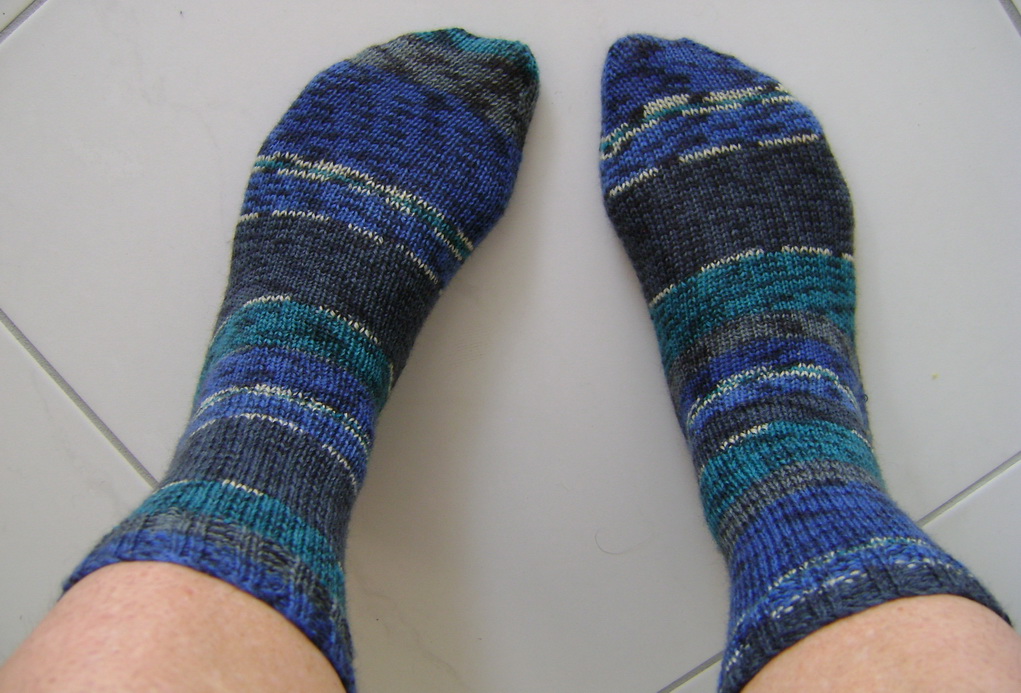
I started my ‘Bluey’ socks while I was on holidays in Noosaville in July and finished them on my return home. I’ve had a bit of a spate of knitting plain vanilla socks using some lovely patterned yarn. I think I’ve finally learned my lesson….you need to knit a plain sock if you’re using a great self-patterning sock yarn.

Bluey Socks 02This is my first pair of blue socks as I gave the last pair away as a present to a dear friend of mine.

Bluey Socks 04

The pattern comes from the Yarn Harlot’s book “Knitting Rules” – Sock Recipe: A Good, Plain Sock by Stephanie Pearl-McPhee and is an ideal pattern to use with self patterning sock yarn. Nearly 10,000 pairs of socks have been made using this pattern and recorded on Ravelry!!!! I know the pattern off by heart now.

Bluey Socks 08

Nothing like getting some different photos when you’re on your holidays and right beside the Noosa River.

Bluey Socks 06

Love the heel flap in this pattern…Sl1, K1 repeat across the odd rows and then Sl1, P across the even rows.

Bluey Socks 16

Bluey Socks 18

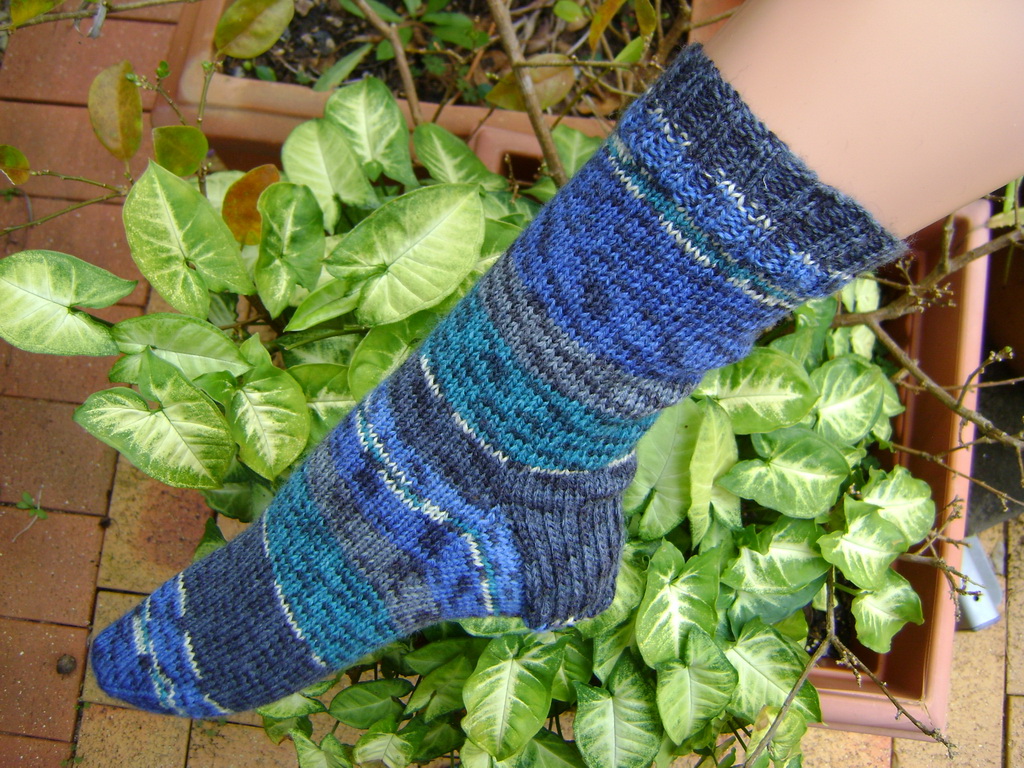
I used S.R, Kertzer On Your Toes 4 Ply with Aloe Vera, one of the many balls of sock yarn I’ve purchased over the last year. It’s now discontinued.

On Your Toes 01

Bluey Socks 10

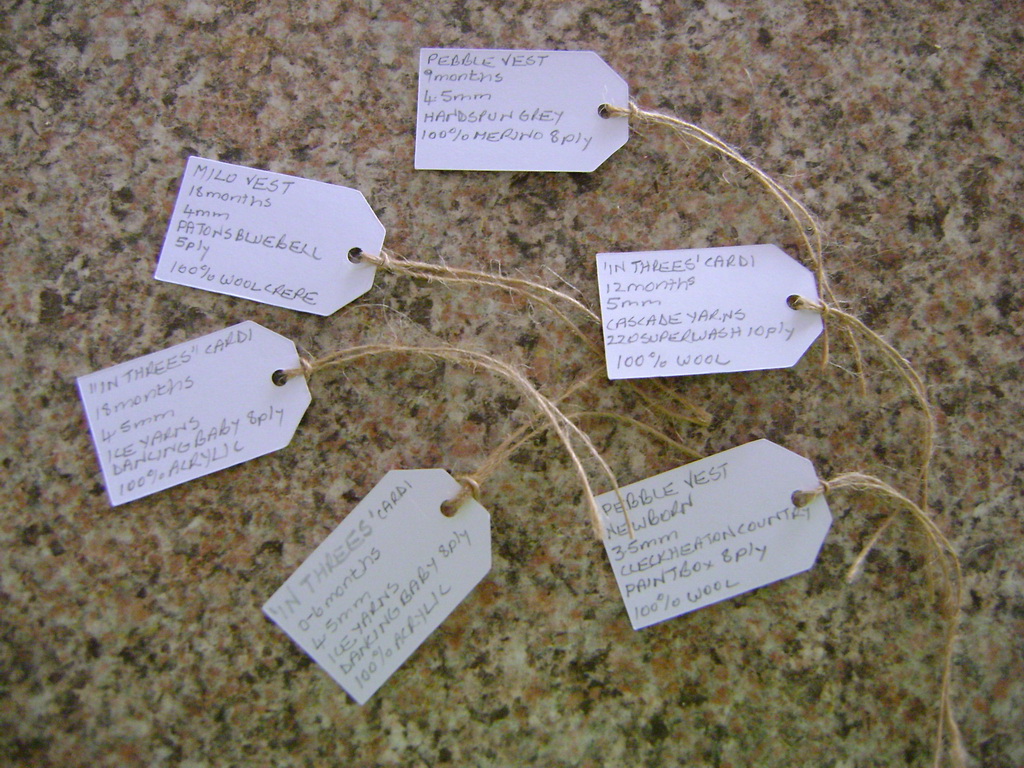
I must start looking for another pattern with some detail and use some of my solid coloured sock yarn but all I seem to be doing is jumping between knitting all sorts of different items….from baby clothes to bags to socks to scarves to hats….. It’s so much fun having access to so many fantastic free knitting patterns on Ravelry.

Until next time…

Melanie

Three Little Pebble Vests

I know I’ve said it before but I’d be lost without Ravelry…this is where I get lots of my ideas for knitting projects and my latest is the very popular baby’s Pebble Vest. Over 3,000 of these little vests have been knitted so that shows you how popular this free pattern is.

My first Pebble Vest which I have called ‘Forest’ was knitted exactly as the pattern dictated however upon reflection it will only really fit a newborn baby for a short time especially if the baby grows quickly!

Pebble Vest Forest 01

The vest is knitted in one piece and so easy to make. The hardest (or most tedious I should say!) part is sewing on the buttons!

Pebble Vest Forest 03

I have more of this yarn so may even make a larger vest. Aren’t those forest colours just gorgeous.

Pebble Vest Forest 02

The yarn I used is Cleckheaton Country Paintbox 8ply. It’s now been discontinued so I’m glad I have a little stash of it. The recommended needle size is 4mm however the pattern called for 3.5mm which made for quite ‘snug’ knitting.

Cleckheaton Country Paintbox Green 2

I was quite enthusiastic when I finished this little vest and was revved up to make another one so I went fossicking in my stash (I love having a large stash….it’s like going shopping without having to pay!) and found this handspun merino 8ply that I bought on Ebay in May last year. It’s probably not the first choice as a colour for a baby but if you could feel how soft the knitted vest is you’d agree with me that it’s ideal baby wool. I used 4.5mm needles.

Handspun Merino Grey 01

Here’s my ‘Slate’ pebble vest…

Pebble Vest Slate 01

I love it. As you can see I jazzed it up with brightly coloured buttons to make it more ‘babylike’. Different buttons adds more interest to these little garments too.

The great thing about Ravelry is that most knitters will comment on any adjustments they make to a pattern so I studied them all and made my own adjustments to make this vest a bit larger. It’ll fit a 46cm chest which is approximately an average 9 month old baby.

Pebble Vest Slate 03

Now all I need is a grandchild to pop in it! But I don’t think that’s going to happen for a while 😦

I’ve also knitted a Ribbed Pumpkin Hat in the same yarn as the original skein weighed 125g and this little vest only took 50g so I have lots left over.

Ribbed Pumpkin Hat Slate 01

Ribbed Pumpkin Hat Slate 03

And here’s my third Pebble Vest christened ‘Leaves’ as the colours depict the different colours of leaves.

Pebble Vest Leaves 03

I cast on 100 stitches and used 5mm needles for this vest so it should fit a two year old toddler. It has quite a bit of stretch in it too.

Pebble Vest Leaves 04

You don’t even need to use matching buttons….so long as they’re the same shade as your vest you can mix and match with what you have on hand. I have a few bottles of different coloured buttons so I love sorting through them to find what looks good on these vests.

Pebble Vest Leaves 06

Here’s a close up picture of those lovely shades of green, brown, camel and cream.

Pebble Vest Leaves 05

I used Ice Yarns Baby Batik for this vest. It’s a 100% acrylic so will be ideal to care for but I would still only hand wash any knitted garment.

Ice Baby Batik Brown Green Camel Cream 4

One last picture…

Pebble Vest Leaves 07

And here’s the three Pebble Vests in the order they were made.

Pebble Vest Forest 02-tile

Until next time…and I pose the question ‘why am I knitting baby garments again when I have so many other things to knit for myself?’ No idea!

Melanie

Weekend Chit Chat and Handy Ideas

I’m on a bit of a roll knitting baby garments and putting them away in my ‘Grandma’s glory box’ for the day when eventually I will be blessed with a grandchild. I was thinking the other day that it would probably be an idea to actually label each garment so I don’t forget (which is easy for me!) what pattern I used, what yarn, what needles etc.

So I hopped onto Ebay (one of my favourite shopping experiences) and searched for label tags and was inundated with choices. These are the labels I bought….very handy as they came with a separate ball of rustic looking twine.

Labels 01

The twine can be cut to size to suit your needs.

Labels 02

I’ve written as much detail on each label as I think necessary especially whether it’s a wool or acrylic garment.

Labels 03

I just love the colours in this Ice Yarns Dancing Baby yarn.

Labels 04

This gorgeous orange cardigan is made using the Cascade 220 Superwash wool.

Labels 05

And this is the Milo Vest made in Patons Bluebell 5ply crepe wool.

Labels 06

My very first Pebble Vest made with Cleckheaton Country Paintbox 8ply wool.

Labels 07

And my second Pebble Vest made with a handspn 100% Merino wool purchased on Ebay.

Labels 08

Here’s a sneaky peek at my latest Pebble Vest. I’m using 5mm needles with the Ice Yarns baby yarn and this time I cast on 100 stitches to make a larger version.

Pebble Vest Leaves 01

Pebble Vest Leaves 02

And now for something completely different. I tend to use quite a few medium sized freezer bags and always have a devil of a job trying to separate them when they’re still in their packaging so I’ve come up with such an easy idea. I simply found the top of the bundle and punched a hole in one corner. Make sure you double check that you’ve got the top opening as it’d be a disaster if you punched a hole in the bottom of the bags which would render them quite useless!

Plastic Bags 01

Once you’ve punched a hole just push a large hook through them and voila now it’s so easy to select a bag by simply slipping it off the hook. I’ve got them hanging inside my pantry.

Plastic Bags 02

That’s all my chit chat for now….back to more knitting. Until next time…

Melanie

The Cutest Little Baby Cardigans

I spend a lot of time on Ravelry and there are particular knitters whose projects I like to check out to see what they’re knitting at the current time. One of my fave knitters has made this little cardigan quite a few times so I decided to buy the pattern and make it too.

In Threes Cardi 03

Isn’t it just the cutest little baby cardi you’ve ever seen? The best thing about this pattern is it’s all knitted in the round and in one piece. Yay!! No seams….no joining. All you have to do is sew on the buttons. How easy is that? And it’s all plain and purl knitting so an ideal pattern for a beginner who wants to get a bit daring and start knitting larger items with a bit more detail.

In Threes Cardi 05

I used one of my all time favourite 10ply (worsted) yarns for this project. It’s Cascade 220 Superwash and it’s fantastic to knit with. This yarn is part of the bulk ‘end of dyelot’ sale I purchased from Yarn Glorious Yarn. I’m so glad I splashed out and bought so many balls as I’m slowly working my way through them knitting all sorts of goodies.

Cascade 220 Superwash 1976 Sunshine Heather 2

I used this yarn to make my Mock Cable Baby Hat and Ribbed Pumpkin Hat and I’ve just finished knitting some slippers in this yarn as well which I’ll feature soon.

The pattern I used is ‘In Threes: A Baby Cardigan’. This link will take you to some photos of the cardigan with little bodies in it! It’s perfect with a little long sleeved top underneath.

This is the back view of the cardi.

In Threes Cardi 02

One more pic….

In Threes Cardi 01

Now because I loved this pattern so much I made two more cardigans! This one is size 18 months and I added another repeat at the bottom and by doing this I used up the whole ball of yarn less a few centimetres.

In Threes Cardi Beach 01

I’ve called this cardi ‘Beach’ as the colours remind me of the sea, sun, sand and occasional cloud at the beach.

In Threes Cardi Beach 03

It looks quite long doesn’t it? But hopefully it’ll keep an 18 month old extra warm around its little bottom and the top of the legs.

In Threes Cardi Beach 04

The yarn I used is Ice Yarns Dancing Baby which is a 100% acrylic DK yarn. I used 4.5mm circular needles. Now I generally only use acrylic for decorations or for items in the home and not for garments, however, I just couldn’t resist the colours in this yarn and being acrylic it will be easier for a mum to maintain although I would still be handwashing any baby items rather than tossing them in the washing machine.

Ice Yarn Multi White Brown Orange Yellow Blue

This is the size 0-6 months size. Again, it is just too cute for words.

In Threes Sand n Sea 01

I called this cardi ‘Sand ‘n’ Sea’ as it reminds me of the sand and the sea.

In Threes Sand n Sea 03

In Threes Sand n Sea 05

Yes, you guessed it, this cardi is also made with Ice Yarns Dancing Baby. How can you resist these colours?

Ice Yarn Multi White Camel Blue

And just to finish it off I made this little Ribbed Pumpkin Hat to match the cardi.

Pumpkin Hat Sand n Sea 01

Pumpkin Hat Sand n Sea 03

Pumpkin Hat Sand n Sea 04

In Threes Sand n Sea 01-tile

All I need now is a grandchild but I don’t think that’s going to happen for quite a while. Although by the time a grandchild does arrive he or she will have a massive knitted wardrobe full of everything imaginable!

So for the moment these cardigans will be going into my ‘Grandma’s glory box’.

This cardigan pattern is definitely a favourite one for me and one I’ll be using quite a few times I imagine.

Until next time…

Melanie

Alpaca Bas Relief Hat

I am slowly but surely writing stories about the knitting I completed on my recent four weeks holiday which finishes tomorrow 😦 Then it’s back to work on Tuesday. This little hat was one project I completed while I spent two of those weeks knitting at Noosaville.

I had to Google Bas Relief as I had no idea what it meant. Here’s the definition I found:

“A French term from the Italian basso-relievo (“low relief”), bas relief is a sculpture technique in which figures and/or other design elements are just barely more prominent than the (overall flat) background.

Bas relief is created either by carving away material (wood, stone, ivory, jade, etc.) or adding material to the top of an otherwise smooth surface (say, strips of clay to stone). This is a technique as old as humankind’s artistic explorations, and is closely related to high relief.”

I had no idea the name of this pattern was so profound! Anyway, here’s my Bas Relief Hat…

Bas Relief Hat 03

The pattern is in Issue 41 (Winter) of the Australian Creative Knitting magazine.

Bas Relief Hat 07

My hat is made from the softest and most luxurious alpaca yarn that I purchased in May last year from Stanmore Park Alpacas at Yatala (south of Brisbane). The weekend was an open day as part of National Alpaca Week. The yarn cost $6 for a 50g ball and I used 4mm knitting needles.

Bas Relief Hat 01

I loved every moment knitting with this alpaca yarn. As it came from alpacas on the stud I visited and was spun by the owners, it still had a few little bits of dried grass in it which gave knitting the hat a real organic and earthy experience.

Alpaca Variegated 02

I knitted my Betty Bear in this yarn as well and she is incredibly soft too. If I knit this hat again I will have to remember to add another repeat as the hat is quite snug over my rather large head!

Bas Relief Hat 10

This is the third hat I made for this winter but unfortunately due to rather mild Brisbane winter weather I didn’t get to wear any of them!! Hopefully next year it’ll be a bit colder or maybe I need to relocate to Tasmania where I’ll get lots of use from my knitted goodies.

Until next time.

Melanie

My Gorgeous Green Elinya Scarf

It seemed to take ages to finish this scarf and that’s because each row increased by two stitches so the end result was over 200 rows!! I started it on 7 March and finished it on 25 July 2013. It was one of the UFOs I took on holidays with me. This is an easy knit as it’s only garter stitch but even that got a bit too much at times.

Elinya Shawl 01

Elinya Shawl 03

What I love about this shawl is there is heaps and heaps of width in it so you can wrap it around yourself very easily.

Elinya Shawl 04

Elinya Shawl 05

You can even wrap it around your neck and it makes a nice warm and snug cowl.

Elinya Shawl 06

Elinya Shawl 07

It has heaps of length at the back too…

Elinya Shawl 08

The pattern calls for using two different yarns to create a stripe effect however this yarn did the job perfectly. The garter stitch really shows off the different shades of green.

Elinya Shawl 10

The picot edge took about two hours to bind off!! It was a process of casting on two stitches and then casting off four stitches….a bit like taking two steps forward and then four steps back. It seemed to take forever.

Elinya Shawl 12

I cannot rave on enough about this yarn. It’s Koigu Painter’s Palette Premium Merino (KPPPM) and it’s a dream to knit with. It’s a 4 ply (fingering) yarn and is 100% merino wool. I bought five skeins of the yarn last July from Yarn Glorious Yarn in Brisbane as I fell in love with the gorgeous green colours in it. I had no idea what to use it for but when I found this pattern – Elinya Shawl – I knew they were a match made in heaven.

Koigu KPPPM 02

Koigu KPPPM Green

If you wanted to you could keep knitting and make the scarf even larger and deeper. I have the same yarn in two more different colourways so I am tempted to make another Elinya Scarf.

Until next time…

Melanie

Ever Thought About Joining a Sock Yarn Club?

Earlier this year I joined my first ever sock yarn club when I stumbled across the details on Dyed By Hand Yarns website. This is how the sock club works: Two skeins of sock yarn are posted out in the last week in March, May and July. Yarns included are 2 x Tough Stocking, 2 x Mother’s Love, 1 x Silk Stocking and 1x Blue Chip Stocking.

What I loved about it was that each skein of yarn was dyed in a colour inspired by something Australian. These colours are exclusive to yarn club members for 12 months and custom dyeing of these colours on any yarn base may be ordered by yarn club members for the duration of the club.

I have just received my final instalment in the 2013 sock yarn club so I thought I’d recap on all six skeins I received this year.

The first yarn in March’s instalment was called Spotted Gum and I loved how the colours exactly mirror those of the spotted gum tree. I haven’t knitted anything yet with this skein but am open to suggestions. I feel it is much too nice to be on my feet so am thinking maybe a scarf or a shawl.

Dyed By Hand Yarn Spotted Gum-tile

The second yarn in March’s instalment was called ‘Vegemite’. Who’d have thought to dye a yarn to resemble the colour of Vegemite but of course it is quintessentially Australian isn’t it?There are reddish flecks throughout the yarn which adds some interest. Maybe a pair of socks that has a great stitch pattern definition.

Dyed By Hand Yarn Vegemite-tile

The first yarn in May’s instalment was called ‘Flame Tree’ and I love its rich and vibrant colours. Definitely a scarf I think as these colours must be shown off and seen. Any suggestions for a pattern?

Dyed by Hand Yarns Flame Tree 01-tile

The second yarn in May’s instalment was called ‘Happy Wanderer’ and again Julie has captured the colours so well. Maybe a hat and some fingerless gloves would fit the bill.

Dyed by Hand Yarns Happy Wanderer 03-tile

The first yarn in July’s instalment was called ‘White Opal’ and its beautiful subtle hues really captivated me. I instantly thought of knitting a baby shawl which could be a family heirloom. I may need to purchase another skein if I want to make a decent sized shawl. Wouldn’t it look fantastic? And the colours would suit a baby boy or girl. Any suggestions for a pattern that would really show off these colours? Oh and by the way, this yarn is a 70% superwash Blue Faced Leicster / 20% silk / 10% cashmere so would be perfect against a baby’s delicate skin.

Dyed by Hand Blue Opal 02-tile

And finally, the second yarn in July’s instalment was ‘True Blue’. Now I don’t have much in the way of blue yarn and on a few occasions I’ve thought about knitting something in blue. Now I have the yarn! I’d probably use this yarn for a shawl or a scarf as it is so lovely and soft…a 50% superwash merino / 50% silk.

Dyed by Hand True Blue-tile

Now, as you can imagine, buying yarn is quite a personal experience as you’re generally selecting colours and yarn that you’re drawn to and what is your personal preference. To leave this up to someone else is a bit of a gamble as you have no idea what you’ll be getting do you?

When I saw that the 2013 sock yarn club would be themed ‘Australian’ I found that interesting and thought the colours could be different from what I’d usually buy and I was right in most cases. You can’t really go wrong when it comes to the colours of the Australian landscape.

I am definitely glad I joined this sock yarn club and congratulate Julie from Dyed By Hand Yarns for producing such a wonderful array of colours for me to knit with.

I really need to find the right pattern for each yarn and then get stuck into knitting some garments.

Looks like I’ll be signing up for the 2014 sock yarn club.

Thanks Julie! Until next time…

Melanie

Red Basket Weave Scarf

The pattern for this scarf comes from the yarn band. It’s very simple and uses three balls of yarn…cast on 30 stitches. Rows 1-3 K3, P3 repeat to end of row and Rows 4-6 P3, K3 repeat to end of row. Repeat these six rows until you’ve completed the three balls of yarn…remembering to keep some yarn for binding off.

The yarn is Moda Vera Signorina which is a 57% acrylic / 40% wool / 3% other yarn. The ‘other’ is the small disc repeated throughout the yarn.

Moda Vera Signoria 03

I used this yarn to make some Christmas bauble decorations for friends last year and was very happy with the result.

Christmas Baubles 3

I decided to use a provisional cast on so I could do a three needle bind off at the end. I’ve never done a provisional cast on so I quickly found a great YouTube video that explained the crochet provisional cast on. You can easily just do a cable cast on, bind off at the end and sew the ends together if you prefer.

Red Scarf 01

The pattern knitted up quite effectively.

Red Scarf 02

Red Scarf 05Now for the joining section. I very gingerly undid the provisional cast on and as I removed it I hooked the live red stitches onto another needle.

Red Scarf 07

Now there are two ‘live’ ends.

Red Scarf 08

I could have grafted the ends together but opted for a three needle bind off which is a bit quicker.

Red Scarf 10

Getting there!

Red Scarf 11

All done!

Red Scarf 12

The finished scarf looks great and those tiny plastic discs really catch the light.

Red Scarf 13

This is how I’ll wear the scarf…wrapped around once.

Red Scarf 14

Another successfull knitting project and one from a yarn band too! I also have three balls of this yarn in black bought for the same purpose. Not sure when I’ll get around to knitting it though. Although this is an easy pattern to knit, it did take a while to get through the three balls and it was only some serious holiday knitting that enabled me to finish the scarf in five days!

Until next time…

Melanie